

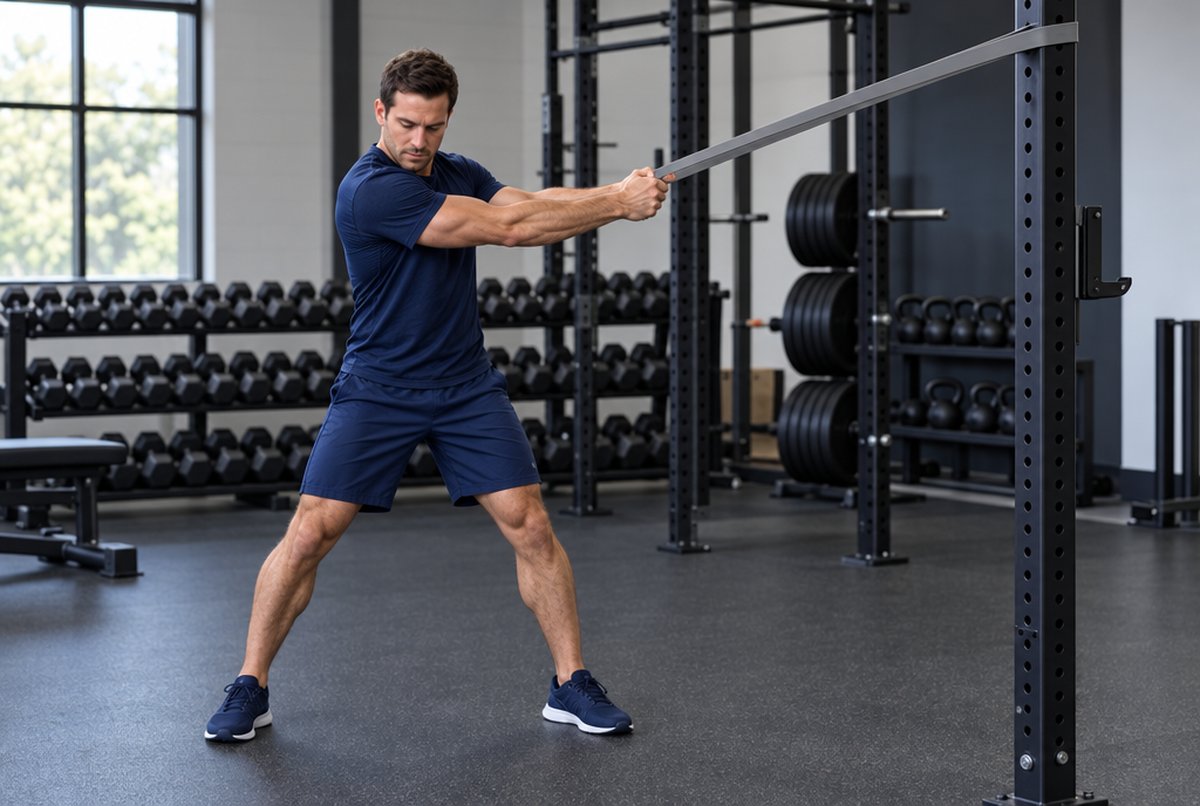
A woodchop with a resistance band trains rotation through the hips and torso along a long diagonal line. You do not flop through the twist. You drive the turn from the ground up while the midsection resists collapse. That is different from a Pallof press, which holds still against a sideways pull. Use both: anti-rotation for control, woodchops for trained rotation under load.
What the woodchop trains
The primary work is rotational power and control across the trunk. The hips start the turn. The ribcage follows. The arms finish along the band line. Obliques and deep trunk muscles keep the spine from folding sideways or rounding as you rotate. Glutes and legs provide the base. Shoulders stay quiet: they guide the band; they do not pull the rep with the arms alone.
High-to-low chops load a diagonal from above the shoulder toward the opposite hip. Low-to-high chops reverse that line. Both teach the same skill: rotate on purpose without losing trunk height.
Setup
Anchor height. High-to-low: fix the band at or above head height. Low-to-high: fix it near the floor or around mid-shin. A solid rack, door anchor rated for the load, or outdoor bar works.
Stance. Feet about hip- to shoulder-width, or a slight staggered stance with the trail foot away from the anchor. Soft knees. Weight mid-foot. Face about 90 degrees from the anchor so the band comes across the body.
Band and distance. Start with a Light or Medium loop. Step out until you feel light tension at the start position - not slack, not a fight. Hands can hold the loop, a handle, or a short bar clipped to the band. Keep the wrists neutral.
Brace first. Before the first rep, set the ribs over the pelvis and brace as if someone will nudge you from the side. That brace stays on through the turn.
Step-by-step (high-to-low)
- Stand tall beside the high anchor. Hold the band with both hands near the shoulder farthest from the anchor, elbows soft.
- Brace. Soften both knees. Keep the pelvis level.
- Drive the turn from the trail hip and foot. Rotate the pelvis and then the ribcage toward the anchor-side hip.
- Guide the hands on a smooth diagonal toward the opposite hip. The band stretches as you finish.
- Pause briefly at the end without collapsing the low back or letting the shoulders shrug.
- Return under control along the same line. Do not bounce out of the bottom.
- Switch sides after the set, or alternate sides each rep if your space allows a clean reset.


For low-to-high, start with the hands near the hip closest to the low anchor and finish the hands high across the body toward the opposite shoulder. The hips still lead.
Technique cues
- Hips start the rotation. Arms follow.
- Keep trunk height. Do not shrink toward the floor as you turn.
- Soft knees throughout. Locked knees dump the load into the low back.
- Ribs stay stacked over the pelvis. No flaring at the finish.
- The band path is a diagonal, not a side bend and not a row.
- Exhale as you chop. Inhale as you return.
Common faults and fixes
Arms pull first, hips stay still. Reset: hips turn, then the hands follow. Slow the first half of the rep until the pelvis moves first.
Side bend instead of rotation. You are folding toward the finish hip. Stand taller, keep both shoulders level, and shorten the range until the turn is clean.
Ribs flare at the finish. You lost the brace. Re-brace before the turn and finish with the pelvis level.
Knees lock and the low back takes over. Soften the knees and push the floor away gently as you rotate.
Too much band or too far from the anchor. The start position already feels maxed. Step closer or drop a band level until you can control the return for two seconds.
Wrists bent and shoulders shrugged. Quiet the upper traps. Keep wrists straight and elbows softly bent.
Regressions and progressions
Make it easier when the turn looks messy or the low back complains.
- Use the Light loop and stand closer to the anchor.
- Shorten the range: stop when the hands reach mid-thigh (high-to-low) or mid-chest (low-to-high).
- Kneel on the trail knee for a half-kneeling woodchop to reduce the balance demand.
- Pause one second at the start to own the brace before you turn.
Make it harder only after both directions feel quiet on both sides.
- Move to Medium, then Heavy.
- Step farther from the anchor so the finish stretch is longer.
- Slow the return to three seconds, or pause one second at the end range.
- Use a slight staggered stance and drive harder through the trail foot.
Keep the Pallof press in the same training block when you want anti-rotation contrast: hold still against a side pull first, then earn clean rotation with woodchops.
Sample sets
Two to three sessions per week is enough for most people. Example:
- 3 sets of 8-10 reps per side, high-to-low, Light or Medium
- Rest 60 to 90 seconds between sides or sets
- Optional second block: 2 sets of 8 per side, low-to-high, same band
The last two reps should feel firm at the finish while the trunk stays tall. If form breaks on rep five, drop the band level or shorten the range. Progress one variable at a time: cleaner turn, slower return, then a stronger band.
Choose a band
Pick a loop that lets you rotate with a tall trunk and a controlled return. aerobis Premium Powerbands are 100 cm silicone loops, latex-free, with rounded edges. They stretch up to 300 %. Light suits learning the diagonal. Medium covers most working sets. Heavy waits until both sides match and the brace holds. One set covers high-to-low and low-to-high at home or outdoors.

Leave a comment
All comments are moderated before being published.
This site is protected by hCaptcha and the hCaptcha Privacy Policy and Terms of Service apply.